Yoga month: good for running, CrossFit & your abs!

IMG_7368

It’s that time again when another challenge month has come to an end and it’s on to the next. February was yoga month where Dane and I did at least 10 minutes of yoga every day.

We decided on ten minutes because it seemed like a manageable amount of time to fit in to our day and could easily be done in the morning, before bed or as a way to stretch after training.

We usually ended up doing more though and I downloaded two yoga apps and went on YouTube for tutorials. After a week or so though I had learnt enough combinations to create my own routine.  Check out Dane’s website – All Things Movement –  where he will soon be posting a 20 minute yoga routine guaranteed to get that blood pumping and those muscles working.

As a runner I have inevitably tight hips, tight hamstrings and poor shoulder mobility from the repetitive motion of pounding the pavements but after 28 days of yoga I saw noticeable differences.

yogi 1

Here’s what I noticed:

– Positions such as classic downward dog helped me to improve the flexibility of my hamstrings and over the course of the month simple moves such as forward bends became easier and I could gradually go forward that little bit more. I do think it’s important to say that without pushing myself during some sessions I might not have improved as much and yes it is painful but like any other training the pain is worth it.

– My general mobility and range of motion improved. I noticed that my squat depth improved as I had been struggling with this after the marathon due to majorly tight hip flexors. Not only that but the range of motion in my shoulders improved too which I am thrilled about as it’s something I really need to work on. Again, I’m not going to lie this was painful at times and I had to push myself.

– Yoga isn’t painful all the time though! It gave me new ways to stretch after running, a way to relax before bed and a better way to start the day with that wonderful yoga feeling. If you’re a CrossFitter, yoga can help to counter some of that soreness after a tough metcon WOD as well. I also slept better which, although I can’t be sure, I believe was helped by yoga.

– Holding a pose or stretch and feeling that “burn” makes it easier to push through the pain of a long run – obviously don’t push through if you’re injured – but it can help you to focus and work through it when you’re struggling. It takes your mind (and body) to a place where you can access that endurance when you need it most during a race or training run.

– Practicing yoga helped me to breathe more efficiently when exercising and is something I think is particularly beneficial to runners. It can help with efficiency and eventually your breathing will naturally match your pace.

– I became more aware of where my body was/where I was placing my weight. My balance improved and I was aware of how I needed to adjust the weight to improve my balance and performance. This not only helped with my running but also in CrossFit with elements such as engaging my shoulders when doing an overhead squat and squatting in general thinking about which part of my foot I was putting my weight on.

– Yoga helps to improve strength and most definitely your core strength as you have to stay tight during each pose.

I definitely think that to keep seeing these benefits I need to keep some yoga in my training routine. I won’t do it every day but I will try and aim for one or two 30 minute sessions a week – I really enjoyed it! 

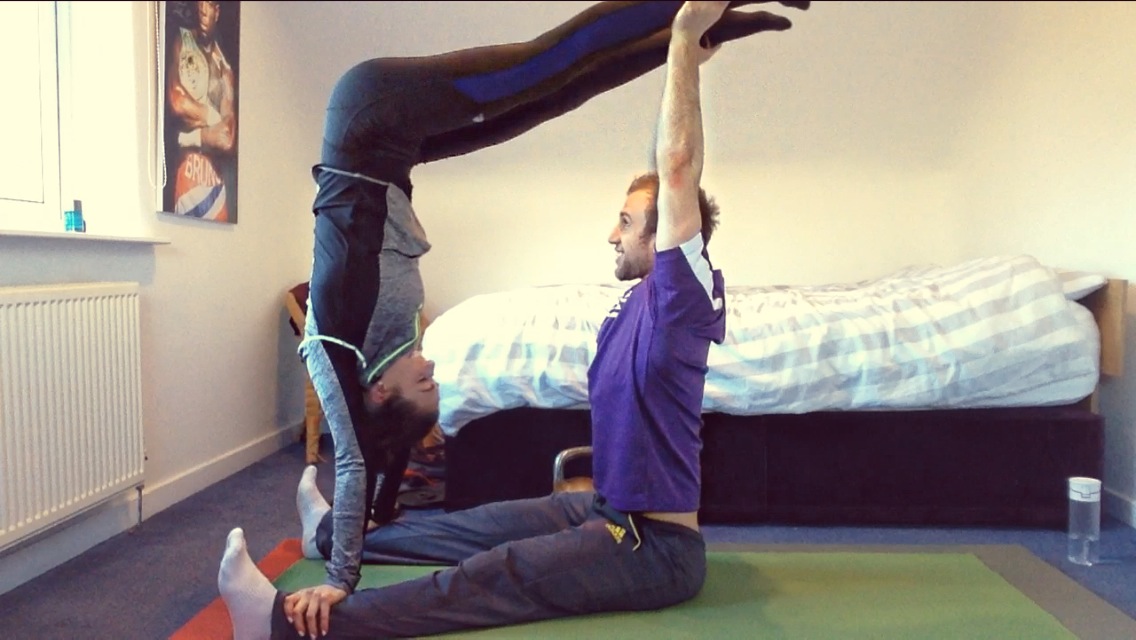
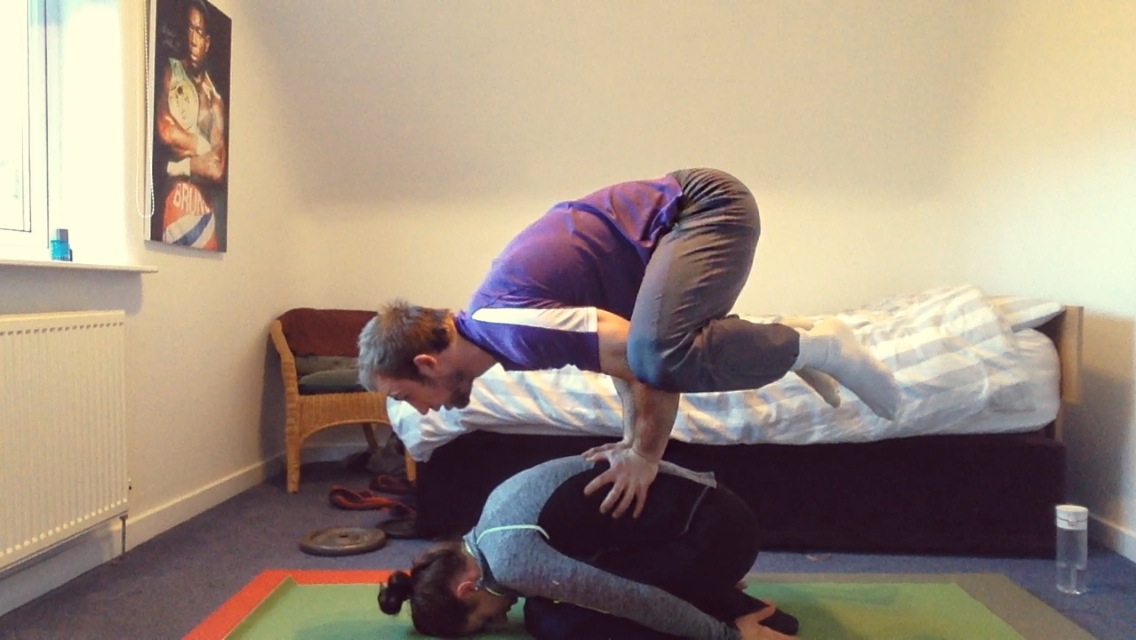
Dane and I decided to round off yoga month with some acroyoga and I’m still laughing at our attempts! My abs certainly got a good workout from all the laughing as well!

We did manage to nail a few poses though and it was so much fun! I definitely think that the 28 days of yoga prior to that helped with my strength, mobility and flexibility.

Here’s what we managed to do… (keep reading for a hilarious acroyoga fail video.)

IMG_7367IMG_7361  IMG_7366

Acroyoga fails….(I’m still laughing now!!)

On the second one watch how quickly Dane manages to get his legs in to that lotus position!!

http://https://www.youtube.com/watch?v=VcCW0TnlGpA

March is handstand month – follow @hbryan91 on Instagram and @hannahbryan91 on Twitter to see what we’re doing. I’ll post a piece soon on the handstand progressions I’ll be doing!

🙂


Avocado & sundried tomato stuffed burgers

IMG_7225 IMG_7230

I’m a massive fan of home made beef burgers because they’re so easy to make and you know exactly what you’re getting.

If you use lean minced beef it cuts down on that fatty content as well which is always good. Now on to the best bit, sundried tomato and avocado! Who wouldn’t want that stuffed in a burger!? It’s a match made in heaven in my opinion and the result was a taste sensation.

If you make a big batch of these you can keep them in the fridge and take some for lunch the next day as well.

You will need:

– Pack of lean minced beef
– Two ripe avocados
– 1 small tub of sun-dried tomatoes (from deli counter so no oil if possible)
– Juice of one lemon
– Coriander (chopped, to taste)
– Salt & pepper to season
– Garlic (one/two cloves chopped depending on how much you like)
– One egg
– Coconut oil

To make: 

– In a large mixing bowl add the beef, egg, chopped garlic, coriander and salt and pepper and combine well.

IMG_7211
– In a separate bowl mash the avocado, chopped sundried tomatoes and lemon juice.

IMG_7212
– Using your hands, make two thin-ish burger halves (these are going to make one burger). It is easier to shape them on a surface lightly dusted with flour to stop them from sticking.

– Put one heaped tsp of avocado mixture in to the middle of one burger half and then add the other burger half on top, pinching the sides to form the burger and to keep the avocado in. Repeat until all of the mixture has been used.

IMG_7218
– Add a tsp of coconut oil to a frying pan and fry the burgers on each side for about 10 minutes/until thoroughly cooked. Alternatively you can grill the burgers. I wouldn’t advise cooking them in the oven though as that will dry them out.

IMG_7224
– Serve with sweet potato wedges, crispy kale and corn on the cob.

IMG_7225

Enjoy and don’t forget to tag #hannahshappypace in your creations! 🙂


Super easy, clean chocolate mug cake

If you’re looking for a quick, easy and healthy pudding then look no further because this chocolate mug cake hits all the right spots.

With just a handful of ingredients and made in less than five minutes it’s the ideal healthy pudding when you fancy something sweet or want a chocolatey dessert.

It’s paleo as well!

We added a cheeky Cadbury’s Creme Egg which is not so paleo/clean but Easter is fast approaching after all!

Check out this video below of how to make it.

Hope you enjoy it & make sure to tag #Hannahshappypace in your creations on Twitter & Instagram! Enjoy 🙂


Nutella cheesecake bites

WARNING: if you’re counting calories look away now!  

nutella 1 Nutella 2

You may have noticed that most of my recipes posted on this site are paleo or have low sugar content but not these. Hannah’s Happy Pace is all about finding that balance and trust me, these are the perfect solution for when you crave a sweet treat.

You will need:

For the base:                                                                                                            `
300g biscuits – we used chocolate chip Hobnobs
100g butter

For the topping:
4 heaped tablespoons of Nutella
100g Icing sugar
400g Cream cheese

To make:

-Put the biscuits into a sandwich bag and tie tightly making sure you’ve squeezed the air out. Then take a rolling pin or something similar and bash the biscuits up until they’re really crumbly.
– Melt the butter either in a pan on the hob or in the microwave and tip in to a mixing bowl along with the biscuits and stir until well combined.
– Get a cupcake baking tray and line with cake cases. Put about 1 tbsp of the biscuit and butter base into each case, pressing down to form a firm cheesecake base.
– Refrigerate for about one hour or until firm.
– To make the Nutella topping combine the cream cheese, Nutella and icing sugar in to a mixing bowl and stir well. (It was at this point that I almost forgot about the biscuit base entirely and just began spooning the mixture in to my mouth! If you thought Nutella was good, wait until cream cheese is added to it!!)
– Add about 1 heaped tsp on to the biscuit base and then pop back into the fridge for about 40 minutes to set. Once set, remove from the cake cases and voila – mini Nutella cheesecake bites, it’s as simple as that!

To make it different, why not use Oreos as the base? Or even crumble some Reese’s peanut butter cups in to it as well. Or add some Nutella to the base mixture if you’re really a chocolate fan.

Tag #Hannahshappypace on Twitter and Instagram if you make them – I want to see your creations! 🙂

Enjoy.

Clean & lean turkey burger stack

photo 3


So…this just happened! This is my take on the classic burger and chips and to be honest it’s even better than the original.

For most people burger and chips is an indulgent meal and a treat to have once in a while but this meal is totally guilt free, not to mention filling and nutritious.

The bun has been replaced with portobello mushrooms and sweet potato whilst the chips are my ultimate favourites, roasted parsnip chips – I’m obsessed with them! You can easily make this more low carb as well if fat loss is your goal by leaving out the sweet potato and switching the parsnip chips for kale crisps.

This meal is also fairly cheap to rustle up, using ingredients and basic kitchen cupboard store items – you’ll only need to get the mince in and other fresh ingredients. These burgers were turkey and apricot spiced with cumin and coriander and the flavours are amazing. Apricot also works well with pork mince.

For speed I didn’t actually follow a strict recipe with specific quantities but I’ve added some quantities below if you do prefer following a strict recipe but honestly, it does just work if you throw it all in!

You will need:
For the burger
– 500g lean turkey mince
– 1 red onion, chopped
– 1 garlic clove, chopped
– Salt and pepper
– Sweet chilli sauce
– Coriander, chopped
– 2 tsp cumin
– 1 free range egg (to bind ingredients together)
– 1 tsp coconut oil
– 2 portobello mushrooms (more depending on how many people you’re feeding)
– 1 large sweet potato, chopped width ways
-1 medium avocado
-1 large beef tomato
-50g dried apricots, chopped

For the “chips”
– 4/5 parsnips, chopped
– 1 tsp coconut oil

For the slaw
– Red cabbage, chopped length ways
– Cabbage, chopped length ways
– 2 tsp Dijon mustard
– 2 tbsp balsamic glaze
– 3 tbsp apple cider vinegar

photo 1 (2)

Method:
– Start by pre-heating the oven to 180 degrees and put the chopped parsnips and sweet potato on a baking try and into the oven to roast.
– Put the turkey mince, chopped onion, garlic and seasoning in a large bowl before adding the chopped apricots, coriander, egg, sweet chilli sauce and the cumin. Stir together until well combined.
– Sprinkle a little flour on to a chopping board and shape the burgers (using your hands) on to the tray. Heat a little coconut oil in a frying pan and fry the burgers for about 15-20 minutes until thoroughly cooked.
– To make the slaw, add the chopped cabbage to a bowl and add the vinegar, mustard and balsamic glaze and stir well. I was in charge of the coleslaw and overdid it on the Dijon mustard, oops, so just stick to two tsp of that!
– When the sweet potato/parsnip chips are about 5-10 minutes from being done, add the mushrooms to the tray to roast slightly.
– Once everything is cooked, place one mushroom on a plate followed by a sweet potato circle, then the burger, tomato and avocado before topping with another sweet potato circle and finally the last mushroom top!

I am officially STUFFED now but thoroughly content – it’s all about fuelling your body right after all isn’t it! Enjoy 🙂

photo 2 (1)


Eat your greens at breakfast!

To celebrate Breakfast Week I wanted to write a piece about how I believe breakfast should be done and share with you my most recent breakfast creation.

breakfast sleep

We’ve always been told that breakfast is the most important meal of the day and in my opinion it really is. Recently I’ve changed the way I do breakfast and I wanted to share these changes with you. This is just my opinion though and it’s what works for me, everyone will be different.

First things first, your breakfast should be your biggest meal of the day. Skipping breakfast is a big error as it takes a toll on your energy levels and will leave you reaching for the nearest/easiest snack possible when hunger hits which will most likely be something that’s not going to fuel your body or be the most nutritious start to the day.

Big meals don’t have to mean bad meals; it’s all about picking the right foods to make up that meal. A big breakfast will set you up for the rest of the day and if it’s healthy it will help you to make healthy choices for the rest of the day as well.

Not only that but instead of reaching for a snack when you get to work or when 11am hits, a big breakfast will keep hunger levels satisfied through to lunch time. If you get in to a habit of doing this you’re likely to consume fewer calories throughout the day as well which is good if your target is to lose some weight.

breakfast info graphic

Ok, so what should you be having on your plate on a morning then? This will vary for different people depending on what your goals are. For example, when I’m training on a morning I like to have oats made with water and some nuts/seeds thrown in to add some healthy fats in there. Nuts also provide a reasonably high protein content too. I find that the carbs keep me full until lunch time especially after training. However on the days I’m not training or if I’m training on a weekend and I’ve got more time to make breakfast I’ll have scrambled eggs with veggies and some form of protein.

The ideal breakfast for me will consist of fats, protein and veggies on a plate and in my opinion everyone should try and have some vegetables at breakfast.

Those who start their day with greens on their plate have higher energy levels, improved concentration and don’t crave sugary/bad foods by 11am.

Add your veggies to an egg scramble or to an omelette for something quick on a morning. It’s also a great way to use leftover veg from the previous night’s dinner.

Now to address that dreaded word….fat. Without sounding like a total cliché, fats are your friends! I’m talking about good fats here such as coconut oil, avocados, nuts and nut butters rather than the bad, processed unhealthy fats.

Cooking your eggs in coconut oil or adding almonds or avocado slices are all great to add to your omelettes or shakes/smoothies.

Eating fats will give you energy, ward off hunger pangs for longer and let’s be honest, eating just veggies and meat (protein) does not fill you up!

Be careful though, although these are good fats it is still important to exercise portion control and adapt the amount you need depending on how much exercise you’re doing. Listen to your body and be mindful of when enough fat is enough. Believe me, I’ve been there and know all too well how easy it is to inhale a jar of peanut butter before you can blink.

Most importantly though, the concept is simple- eat real food! You’ve only got one body so why wouldn’t you want to fuel and feed it with the most nutritious foods possible? You’ll feel fuller for longer, have more energy, be alert throughout the day at work and generally just feel more healthy and positive in yourself.

Here’s a phenomenal (if I do say so myself!) breakfast recipe which I made at the weekend to fuel a day of work and training. It’s got some healthy carbs in there, fats from the avocado and protein from the eggs and smoked salmon. The smoked salmon is packed full of Omega-3 which is good for heart health and reducing high blood pressure. Rye bread also has a higher fibre and lower GI content compared to normal bread and so releases energy more slowly keeping you fuller for longer. It is also better for people who are sensitive to wheat or wheat intolerant.

Below is the recipe and nutritional breakdown.

IMG_6687

You will need: 
-Rye bread
– Eggs
– Avocado
– Smoked salmon
– Black pepper to season

Method:

– Put a small amount of coconut oil in a pan and heat before adding beaten eggs to the pan and stirring to scramble.
– Toast the rye bread and then mash the avocado on to the toast instead of butter.
– Top the avocado toast with eggs and the smoked salmon and voilà, a healthy and nutrient dense breakfast.

breakfast breakdown

Check out my other breakfast recipes I’ve posted including these low carb burpee breakfast tarts.

What’s your go-to breakfast? Do you eat the same thing or do you change it depending on work or training schedules? Let me know 🙂


Thai pork mince lettuce wraps

photo 4

As you may have seen from some of my previous recipes  I love Thai food.

This is a super easy dish to make and you’ll be surprised by just how much flavour it packs with just a few, simple ingredients.

Make this as a quick tea when you get in from work or during Sunday night meal prep to have for lunch or dinner for the rest of the week.

You can also use turkey or beef mince but these flavours work really well with pork. What’s more, it is low carb but you can also add brown rice to the lettuce wraps before adding the mince to get some healthy carbs in there if you want to.

You will need:
2 garlic cloves, chopped
1 tbsp fish sauce
Juice of two limes
1 red chilli, chopped
1 green chilli, chopped
500g lean pork mince
1 orange pepper, chopped
1 tsp coconut oil
Handful of coriander, chopped
1 large Chinese lettuce

photo 1 (2)

Method:
– Start by heating the coconut oil in a large frying pan before adding the garlic and the pork mince. Cook thoroughly until the pork mince is almost done and then add the chopped chilli, fish sauce and the chopped pepper.
– Cook on a high heat until the mince is thoroughly cooked then add the fresh lime juice and stir in some fresh coriander.
– To prepare the lettuce leaves simply peel them away and chop off the end before arranging artistically (we tried!) on a plate. If you’re having rice with your wraps then add that in to the lettuce leaf before adding the mince.
– Wrap up the leaves as you eat them (I’d suggest with your hands!) and there you have it, Thai pork mince lettuce wraps.

photo 2 (1)

Serve them with a sprig of fresh coriander on top and a wedge of lime on the side. I guarantee these will go down a treat any night of the week and it is a perfect meal to make in bulk to keep you going for the rest of the week.

Paleo Christmas dinner

It’s beginning to look a lot like Christmas….mainly in my lunchbox.

xmas dinner

Parsnip chips and sprouts are starting to make up a lot of my meals now the festive season is upon us and it is certainly helping me to get in to the festive spirit.

Christmas is stereotypically a time of gluttony and overindulgence. We always reach for that second mince pie, the cheeseboard after dinner or that extra glass of mulled wine.

I hold my hands up to this too, for Christmas becomes yet another occasion whereby we justify over eating as treating ourselves. I have been known to go Furious Pete on a chocolate orange before the main event then promptly open another one straight afterwards.

Christmas doesn’t have to mean gaining a few extra pounds though. Mince pies and mulled wine are fine in moderation but if you don’t want to overindulge this festive season then why not give this Paleo Christmas dinner a try.

It’s so hard to please everyone when making a Christmas dinner but for someone following a Paleo plan or wanting to watch what they eat this month then this dinner will hit the exact same spots that a “regular” Christmas dinner would. Dane and I were left in an absolute Christmas food coma after eating this and immediately gravitated towards the sofa to lie very still for a good 15 minutes.

The sprouts before...

The sprouts before…

The sprouts after...

The sprouts after…

We were incredibly excited to rustle up this Christmas dinner and in particular the sprouts which were bursting with flavour from the bacon lardons and sweetness of the raisins. The pine nuts complimented the crunch of the roasted sprouts and apple perfectly.

We had cauliflower mash, roasted parsnips and carrots, broccoli and of course turkey which was cooked to perfection, if I do say so myself. We even made our own cranberry sauce which was the only non-Paleo element of the dish and totally optional of course.

xmas dinner 3


You will need:
1 turkey crown/whole turkey
Parsnips, chopped in to chips
Carrots, chopped in to chips
Brussels sprouts
Garlic
Pine nuts
Raisins
Cranberries
Bacon lardons/bacon rashers
Cauliflower
1 cooking apple
Broccoli
Gravy granules
Orange juice
Brown sugar
Oil
Seasoning

To make:
– Start by preheating the oven to about 200 degrees and then pop the turkey in. We bought a medium sized joint which we added a bit of salt, pepper and basil to. It needed about 50 minutes in the oven but timings will differ depending on the size of the meat.
– Put the chopped parsnips and carrots on to a roasting tray and cover with mixed herbs and olive oil before roasting for about 30 minutes.
– For the sprouts:  chop them in half and put on a baking tray before adding roughly chopped garlic, cranberries and apple. Roast in the oven for about 25 minutes before frying off your pine nuts and bacon lardons, adding them to the sprouts along with the raisins and roasting for a further five minutes.
– To make the cauliflower mash boil the finely chopped cauliflower until well cooked and then mash after draining and add seasoning to taste.
– When the turkey is almost ready, boil the broccoli and make the gravy and then you’re good to go.

To make the cranberry sauce: (not Paleo)
This sauce is seriously simple and can be kept in the fridge for up to a week.
You will need:
-100g brown sugar
-100ml orange juice
250g cranberries
Start by adding the sugar and orange juice to a pan and then heat until boiling. Add the cranberries and simmer for about 8-10 minutes until they soften.
Once they have simmered for long enough, turn the heat down and the sauce will begin to thicken as it cools.

IMG_5957 IMG_5958

That’s pretty much it, Paleo Christmas dinner is done.  It really is simple to make and no fancy utensils are needed it’s just about getting your timings right.
Let me know if you make it and how you get on.

Merry Christmas 🙂


Banana, pecan & choc chip loaf

IMG_5752


We all need a little treat from time to time and that’s a fact.

Despite being an advocate of clean eating I am aware that this can sometimes become an obsession rather than a lifestyle choice. When we find ourselves saying no to birthday cake in the office or a festive mince pie at a family bash it’s time that we took a step back and re-evaluated our eating attitudes.

My opinion is that balance is key and by not denying yourself treats you can still maintain a healthy body and a great figure whilst maintaining a healthy mind at the same time.

This is where my banana loaf recipe comes in. I am a massive fan of banana loaf and although you can make Paleo banana cake it was a real banana cake that I wanted. Another reason why I wanted to bake a “real” cake was because baking is not my strong point and I don’t like to be defeated. I was thrilled with how this one turned out and I will definitely be making another in the future.

You will need:  (makes one big loaf)
100g soft butter (and a little for greasing)
140g caster sugar
140g plain flour
1 egg – beaten
2 tsp baking powder
1 tbsp Vanilla essence
4 ripe bananas
85g pecans
35g dark choc chips

To make:
– Preheat the oven to about 180 degrees and grease a loaf tin with a small amount of butter ready for the mixture.
– Begin by mixing together the sugar, butter and egg before slowly stirring in the flour and baking powder.
– Next, mash the bananas in a separate bowl before adding it to the main mixture along with the vanilla essence, pecans and chocolate chips before stirring well.
– Pour the mixture into the tin (it was at this point that more mixture went into my mouth rather than the actual tin, whoops!) and bake for about an hour. Test that the cake is ready by putting a knife or a skewer in and if it comes out clean then the cake is done.
– Leave to cool on a wire rack before slicing and then keep fresh in foil.

This is such a simple cake to make and other nuts or dried fruit can be added depending on what you fancy. Enjoy with a cup of tea as a post workout treat or just as a treat in general! 🙂

Burpee breakfast tarts

I ❤ weekend breakfasts and these baked egg tarts are the perfect start to fuel a Sunday Funday.

burpee tart 4

The eggs are baked in a basket of bacon and mushrooms and after you’ve tried making them once why not add other ingredients like tomatoes, spinach or kale. If you’re vegetarian just switch the bacon for half a pepper to create the basket effect.

burpee tart 2 Burpee tart 3

I didn’t follow a recipe for these tarts and sadly I can’t take all of the credit for them as it was a joint creation between my boyfriend and I. They are a great low carb breakfast for someone who is following a Paleo plan and are high in protein thanks to the eggs. More calories are used to digest protein rather than fat and carbohydrates so these burpee tarts will keep you full until tea time.

If that’s not reason enough to give them a go then listen to this highly scientific (kind of!) piece of evidence.
Dane and I are currently doing the 100 burpees a day challenge in the run up to Christmas- yes, even including 100 burpees on Christmas day- which is how the name for this creation came about.  After eating these tarts Dane managed to bash out 100 burpees in an amazing 4mins 32 seconds after already completing 150 just a few minutes earlier!

I think the burpee breakfast tarts should take credit for that…

Proof of Dane's 100 burpees in 4:32 after completing 150 beforehand!

Proof of Dane’s 100 burpees in 4:32 after completing 150 beforehand!

You will need: (makes two tarts)
8 eggs (or 3 whole eggs per tart and one egg white)
Bacon rashers
Mushrooms
Seasoning
Butter to line tart dishes

To make:
– Grill the bacon and whilst that is cooking line the tart dishes with some butter.
– Once the bacon is cooked preheat the oven to about 180 degrees and then line the dishes with the bacon and finely chopped mushrooms. The idea here is to create a lining at the bottom of the tray so that the egg doesn’t leak through.
– Add some seasoning and then crack the eggs in to the tarts before putting in the oven to bake for about 15-20 minutes.
– We added a muffin to ours but they’re great on their own or with avocado or spinach.

Enjoy! 🙂