Burpee breakfast tarts

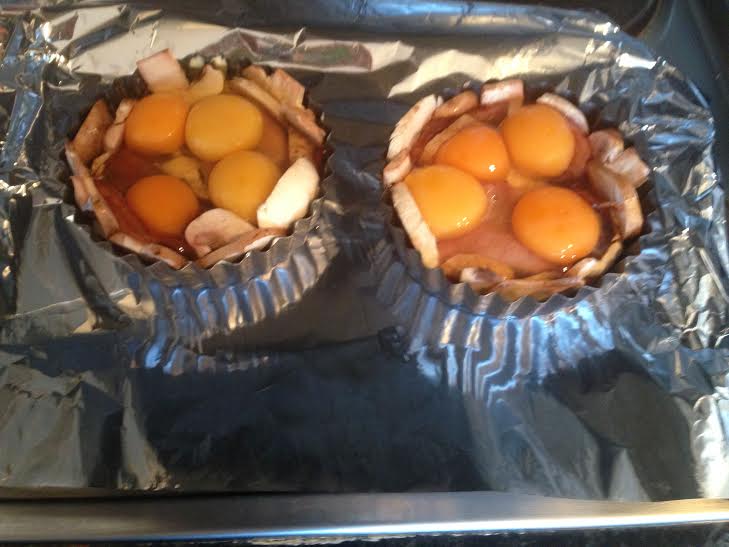
I ❤ weekend breakfasts and these baked egg tarts are the perfect start to fuel a Sunday Funday.

burpee tart 4

The eggs are baked in a basket of bacon and mushrooms and after you’ve tried making them once why not add other ingredients like tomatoes, spinach or kale. If you’re vegetarian just switch the bacon for half a pepper to create the basket effect.

burpee tart 2 Burpee tart 3

I didn’t follow a recipe for these tarts and sadly I can’t take all of the credit for them as it was a joint creation between my boyfriend and I. They are a great low carb breakfast for someone who is following a Paleo plan and are high in protein thanks to the eggs. More calories are used to digest protein rather than fat and carbohydrates so these burpee tarts will keep you full until tea time.

If that’s not reason enough to give them a go then listen to this highly scientific (kind of!) piece of evidence.
Dane and I are currently doing the 100 burpees a day challenge in the run up to Christmas- yes, even including 100 burpees on Christmas day- which is how the name for this creation came about.  After eating these tarts Dane managed to bash out 100 burpees in an amazing 4mins 32 seconds after already completing 150 just a few minutes earlier!

I think the burpee breakfast tarts should take credit for that…

Proof of Dane's 100 burpees in 4:32 after completing 150 beforehand!

Proof of Dane’s 100 burpees in 4:32 after completing 150 beforehand!

You will need: (makes two tarts)
8 eggs (or 3 whole eggs per tart and one egg white)
Bacon rashers
Mushrooms
Seasoning
Butter to line tart dishes

To make:
– Grill the bacon and whilst that is cooking line the tart dishes with some butter.
– Once the bacon is cooked preheat the oven to about 180 degrees and then line the dishes with the bacon and finely chopped mushrooms. The idea here is to create a lining at the bottom of the tray so that the egg doesn’t leak through.
– Add some seasoning and then crack the eggs in to the tarts before putting in the oven to bake for about 15-20 minutes.
– We added a muffin to ours but they’re great on their own or with avocado or spinach.

Enjoy! 🙂

Mission complete : homemade energy bites

IMG_5440

With nothing but a weekend of eating and running ahead it was time to rustle up a new recipe.

I gave them the name Mission Balls due to the absolute mission my friend and I had making them – there was a lot of smoke coming from a borrowed blender at some point! Yet despite that slight mishap, these energy bites turned out well are are a great pre or post workout snack.

I am a snack monster and I am constantly on the lookout for new, healthy snacks that I can grab as I’m leaving the house and take to work ready to eat before training later that day or just to nibble on during the afternoon slump.

These bites fit that bill perfectly and are a much more economically friendly version than buying a bar every day or even a multi-pack box of cereal, energy or protein bars.

They are also ridiculously easy and quick to make and don’t take up much room in the fridge either. Another great thing about them is that you can customise them depending on what fruit/nuts you fancy.

You will need: (makes about 14 energy bites depending on how big you make them)

125g dried apricots
100g raisins
100g cashew nuts
125g dates
25g raw cacao powder
4 heaped tablespoons of honey
3 heaped tablespoons of Meridian smooth peanut butter


IMG_5433

Method:
I found the best way to make these energy bites is to put the mixture into the blender a little bit at a time.
So basically – and this shows just how simple they are to make – put a portion of all of the ingredients into the blender and whizz around until they are well combined.
If the mixture is looking a little dry add more honey or peanut butter.
Keep blending the mixture until it is all combined and then tip out of the blender and into a bowl or on to a plate.
Now you can get your hands involved and form the bites in to whatever shape you desire. I went for balls but bars work just as well. Form them in to the desired shape and then sprinkle them with a bit of cacao powder and pop into the fridge to set and voila, homemade energy bites.


Peanut & almond butter cups

Staring at gooey peanut butter, threatening to spill over the top of a newly opened jar must be what true love feels like.

I love peanut butter and these no bake treats are perfect for combining that love with one of my other true loves, chocolate.
But these treats are sugar free and are made with completely natural ingredients.

I was kindly sent some Meridian Foods crunchy almond butter and smooth peanut butter to sample. Meridian Foods peanut butter has long been my favourite PB brand; not only because it tastes amazing but also because it has nothing added to it.
I hadn’t tried the almond butter before so this gave me the perfect chance to experiment  and I couldn’t wait.

PB jars

Recipe makes 8-10 cups
You will need:
75g Meridian crunchy almond butter
75g Meridian smooth peanut butter
1 heaped tablespoon of honey
50g shredded coconut
25g sultanas

For the chocolate:
75g coconut oil
75g cacao powder
2 tablespoons honey
1 tsp vanilla extract

Method:

Mix the almond butter, peanut butter, honey, coconut and sultanas until well combined.
Put a tablespoon full of the mixture in to cake cases before flattening down with the reverse side of the spoon to create an even finish.
Set these aside whilst you make the chocolate. To make the chocolate, melt the coconut oil in the microwave and then add the cacao powder, honey and vanilla extract and mix well.
Top the peanut and almond butter mixture with the melted chocolate and then pop in to the freezer for about 20 minutes until they are set.
Once they are set, they should be kept in the freezer to keep firm.  And there you have it, a simple and super quick way to rustle up some treats.

You can use just almond butter if you’d prefer or just peanut butter rather than combining them both and you can change the dried fruit depending on what you feel like. The almond butter was so tasty and the slightly nutty texture meant that these bites had a bit of a crunch to them as well – perfect!

 peanut butter and choc cups

Forget the Sunday roast

After getting home at 4am following a night of dancing, my friend Liana and I decided that we were going to get smoked salmon for lunch the next day, or later that day should I say.
But after a slightly longer than planned lie in (I think all that dancing had worn me out) and a lengthy gym session it was time for dinner rather than lunch – and we were in charge of cooking for the whole family!

Chicken is pretty central to our diets so dinner was of course centred around that.

So here is our take on a classic Sunday dinner: Mediterranean chicken

You will need:
As many chicken breast as you like (we had five)
One can chopped tomatoes
One jar passata
Aubergine
Courgette
Garlic
Onion
Olives
Sundried tomatoes
Peppers
Capers
Sunflower seeds (toasted under the grill for a few mins)
Pumpkin seeds (toasted under the grill for a few mins)
Fresh basil

Whilst the chicken is baking in the oven, prep the veg for roasting.
Leave out the capers, olives, sundried tomatoes and nuts. Add the veg to a roasting tin before adding the chopped tomatoes, passata and some cracked black pepper.
Once the vegetables are cooked, chop the chicken and stir in before adding the olives, sundried tomatoes, toasted pumpkin and sunflower seeds and fresh basil.

Another simple yet extremely tasty meal that sticks to the clean eating plan. For those who want to add something exta, throw in some sweet potato to the roasted vegetables.

Homemade Mediterranean chicken

Homemade Mediterranean chicken

#cleantreats

You can go right ahead and file this one under #cleantreats.

Finding a sweet treat to satisfy that after dinner craving when you’re an avid follower of a clean eating plan can be a daily battle.
But treating yourself after dinner needn’t be such a struggle anymore. Whilst having an active weekend with my best friend and fellow clean eater, (dancing until it was too painful to walk in our heels and trying out fun new exercises at the gym), we discovered the perfect sweet treat – minus the sugar, chocolate and all of the other bad things we tend to avoid.

Protein pancakes.

All you need is two eggs (one whole egg and one egg white) and three scoops of protein powder. We tried vanilla and chocolate but they would work with any.
Add a little bit of coconut oil to a pan after creating your pancake “batter” – add some water to the mix if it is too glooopy – and pour a small amount in to the pan. Basically, you make them the same way as any other pancakes!
It genuinely is that simple (although it did take us a few tries to perfect them but by the fifth pancake we had definitely mastered it.
Check it out…

Chocolate protein pancake with stewed plums and frozen berries.

Chocolate protein pancake with stewed plums and frozen berries.

photo 3 (6)

Chocolate protein pancake - it was tastier than it looks, promise!

Chocolate protein pancake – it was tastier than it looks, promise!

We topped ours with stewed plums (courtesy of Liana’s fantastic mum Anne) and frozen fruit. Not only did they satisfy our sweet tooth but we got our protein hit too, an ideal combination.

The rest of the weekend was as usual centred around food and exercise so I thought I’d share some of the other creations we made. Check them out on the next post.

Peanut butter, fruit & nut balls

I confess – I’m not the most organised person in the world, but when it comes to meals I plan them down to the last mouthful. Sunday evening consists of planning the following weeks meals, factoring in training sessions and of course starting that all important meal prep.

Main meals are usually the easiest to plan and with Sunday night meal prep, lunches are easy as well. I find that snacks are my downfall though. Once the afternoon slump hits I’m ready for a boost and I’ve been looking for a way to switch up my snack options.

This is when I decided to get creative. For those who don’t know me, I love peanut butter – on apples, in cookies and more often than not I am guilty of eating it straight out of the tub.
Instead of grabbing a couple of spoonfuls pre-gym, I thought why not incorporate my love of it in with my afternoon snack to give myself a healthy protein hit to keep me going all afternoon.
With that in mind, I created these peanut butter fruit and nut balls.

You will need:
– 1 cup sugar free coconut shavings
– 1 cup flaked almonds
– 2/3 cup sultanas
– ½ cup chopped dried apricots (or any other dried fruit you fancy, I just happened to have apricots)
-Sprinkling of cinnamon
-couple of heaped tablespoons of smooth peanut butter (organic preferably, I love Meridian smooth!) – You can also use chunky if you want a different texture although I found that smooth enables it to set better.

What to do:

-Combine the coconut, almonds, sultanas and apricots into a bowl and blend with a hand blender – this isn’t the easiest of tasks but it doesn’t take long and it helps the mixture to combine.
– Add the cinnamon and then start to add in the peanut butter a spoonful at a time. Add enough so that the mixture is sticking together but not too much that there is more peanut butter than mixture!
– Tip the mixture on to some Clingfilm and flatten out before putting in the freezer for about 20 minutes.
– Once set,  mould the mixture in to balls, sprinkle with an extra bit of coconut if desired and keep in the fridge.

And there you have it – a healthy, high protein and tasty snack for the rest of the week! Now there’s no excuse for me to eat peanut butter straight from the tub – well, at least for the next week anyway.

Peanut butter, fruit and nut balls - my latest creation!

Peanut butter, fruit and nut balls – my latest creation!

Healthy peanut butter cookies

Yes, you did read that title correctly – these flourless peanut butter and choc chip cookies really are a guilt free treat.

These cookies are soft, gooey and packed full of energy – not to mention so tasty they may well become your new go-to treat.

I am a massive peanut butter addict and I’ve wanted to try cooking some guilt free treats with smooth peanut butter for ages and this seemed like the perfect recipe.

Not only that, but these cookies are gluten free as well.

You will need:
-8oz smooth organic peanut butter (preferably organic)
-3oz of organic natural honey (you can add more or less depending on how much of a sweet tooth you have)
-1 egg (flax egg if you like)
-1/2tsp baking powder
-pinch salt
-dairy free choc chips

20140216-131027.jpg

To make:
These really are so easy to make which is yet another reason to love them.
-Mix the peanut butter, honey, baking powder and egg in a bowl.
-Stir in the choc chips then put cookie sized dollops on to a baking tray lined with grease proof paper.

Place in the oven at gas mark 4 for about 12 mins/until the cookies start to turn brown.

The cookies may still look gooey but as soon as they start to brown take them out and leave them to cool. They will firm up but still retain that amazing soft gooey texture inside.

20140216-131002.jpg

Turkey and apricot burgers

If you’re caving a burger but looking for a healthier alternative then this tasty creation is perfect.  

Lean turkey mince is lower in saturated fat than beef mince but still makes a proper burger and teamed with these ingredients it’s packed full of flavour.

You will need:

–          500g lean turkey mince

–          2 garlic cloves, finely chopped

–          1 red onion, finely chopped

–          1 pepper, finely chopped

–          Ginger

–          Coriander

–          250g pack of soft apricots, finely chopped

–          Black pepper to season

–          Oil for brushing

Ingredients for turkey and apricot burgers

Ingredients for turkey and apricot burgers

To make:

–          These burgers could not be easier to make – you basically put all of the ingredients, except for the oil, in to a big bowl before mixing together.

–          It’s easiest to mix it all together with your hands to really make sure it’s combined.

–          Make six burgers before brushing with oil and putting under the grill.

–          Cook for 6-8 minutes on each side until they are thoroughly cooked and the meat is no longer pink.

Ready to go under the grill

Ready to go under the grill

They really are that simple. I served mine with roasted vegetables but they would be great served in a toasted wholemeal pitta with salad for lunch as well.

Enjoy.

Tastier then they look - I promise!

Tastier then they look – I promise!